
Before you spend $41 on Weaponiser Basic, know this: it requires an iLok account, an internet connection at activation, and locks to one machine at a time. If you're working in a facility where iLok dongles are banned, or you split time between two computers and don't want to manage transfers, this is the wrong tool before you even hear a sample.
That said, if you clear that hurdle, what you're getting is a purpose-built weapon and foley design plugin from Krotos, the studio behind sound for Ozark, Brooklyn Nine-Nine, and Terminator: Dark Fate. For a solo composer or a beginner sound designer who needs to put a believable gunshot into a cue without opening three separate apps and stitching audio for an hour, that pedigree carries real weight.
Quick verdict: Weaponiser Basic earns a 3.3 out of 5. At $41, it sits in a frustrating middle ground: strong enough at its core job to save genuine time, flawed enough in its EQ, interface and a nasty reverb bug to remind you this isn't the full picture. Buy it if you're a starter sound designer who needs a fast ITB weapon SFX tool and can live with its limits. Skip it if CPU overhead, a fixed single-monitor interface, and a capped EQ are going to grind your workflow to a halt.
The Catch Up Front
The iLok requirement is the first gate. You need an account, an internet connection when you activate, and you're tied to one computer at a time. That's not unusual for professional audio software, but it matters if your studio situation is at all mobile or shared.
Beyond activation, the interface is small and not scalable. On a 1280×1024 screen, that's the minimum supported resolution, and you're working at exactly one size forever. No zoom. No resize. Owners find this frustrating, and honestly it's a legitimate complaint for a tool you're going to stare at while building a fifty-cue action score.
The EQ is a known weak point. It's peak filter mode only. No shelving. No high-pass to roll off low-end rumble. No low-pass to tame harsh transients. For a weapon SFX plugin where you'll frequently want to shape the crack of a gunshot or the thump of an explosion, that's a real limitation. You'll need to reach for a separate EQ plugin in your signal chain.
CPU use is reported as fairly intensive. Multiple instances will bite. Owners recommend freezing or committing tracks when you're stacking them. Factor that into your session design from the start, not after you've built out twelve layers.
One more problem worth flagging: the IR reverb has a known bug. It triggers a state that requires you to relaunch your DAW and unload all sound files to fix. That's not a minor inconvenience. That's a session-killing issue if it hits mid-deadline.
What You Get If You Clear It
Weaponiser Basic is a sample-and-synthesis SFX design plugin. It ships with 1,385 samples: 515 weapon samples plus content across sci-fi weapons, sci-fi effects, footsteps and surfaces, and whooshes and transitions. That 1.88 GB of assets covers a wider range of sound design territory than its name suggests.
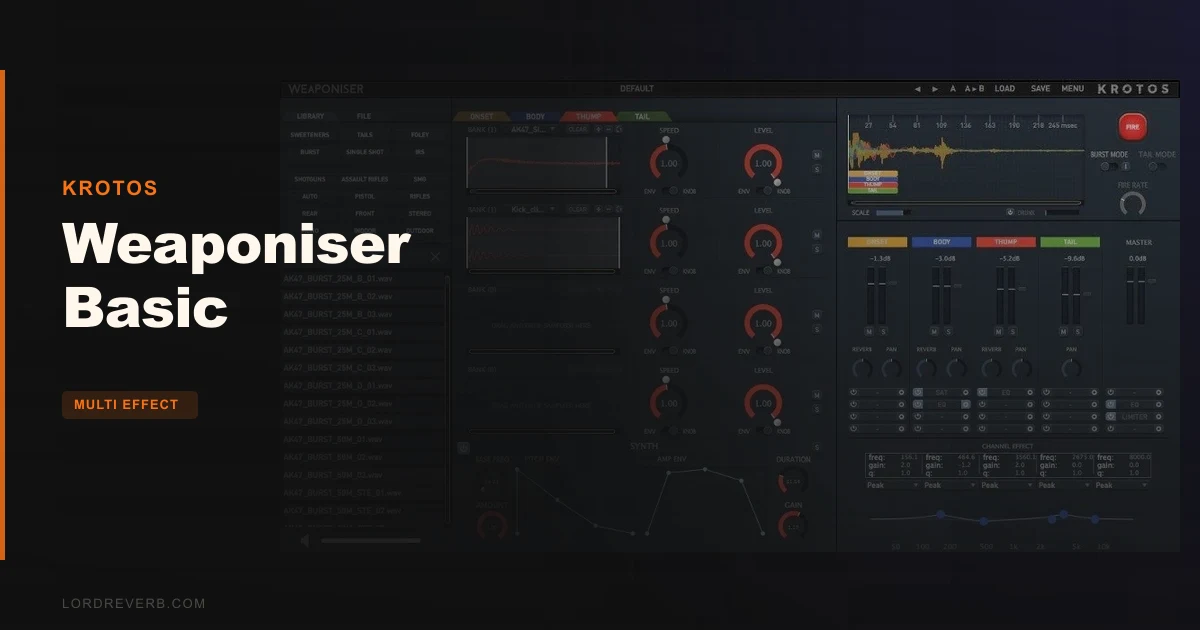
The core architecture runs four sample engines, each capable of triggering up to 80 audio files. Those engines slot into four named sections: Onset, Body, Thump, and Tail. The logic mirrors how a weapon sound is actually built. The Onset handles the initial crack or click. The Body carries the sustained middle. The Thump handles low-frequency impact. The Tail manages the decay and room release.
Three built-in synthesis engines sit alongside the sample engines. These aren't just decorative. They let you blend synthesised tones into the design rather than relying purely on recorded samples.
The drag-and-drop interface means you can import your own custom sounds. If you've got proprietary recordings or existing sound libraries on your drive, you're not locked into the included content. A tag-driven browser handles navigation through the included assets.
MIDI triggering is supported, velocity sensitivity is active for variation, and burst mode lets you generate automatic rapid-fire bursts from single one-shot assets. Fire rate is adjustable in real-time. Each engine can be output to its own stereo track via multichannel output, which means you can process the Onset and the Tail differently downstream in your DAW.
160 presets come included. For a beginner, that's the fastest path to a working sound. For an experienced sound designer, it's a set of jumping-off points.
The Four-Engine Architecture: Onset, Body, Thump, Tail
This is where Weaponiser Basic actually earns its keep, so it's worth spending time here.
The Onset, Body, Thump, and Tail structure isn't just organisational. It reflects the real acoustic anatomy of a weapon discharge. When a gun fires in a room, you hear an initial transient crack (Onset), a sustained pressure wave through the air (Body), a low-frequency thump through the floor and walls (Thump), and then the room's natural decay bleeding off (Tail). By separating those four elements into discrete engines, Weaponiser Basic lets you mix and match them independently.
Say you've got a preset for a standard pistol that works for most of your cue, but the Tail feels too long for a tight indoor space you're spotting to. You can swap the Tail engine's sample independently without touching the other three. That's a genuinely useful workflow when you're spotting to picture and the edit is locked.
Each of those four sections can trigger from the sample engines or the synthesis engines. The synthesis options give you generated tones to blend in, which is how you'd push a real-sounding gunshot into sci-fi territory without replacing all the organic samples underneath.
The colour-coded built-in timeline is what ties this together. It shows where each engine fires relative to the others and lets you offset their timing precisely. Push the Thump engine back a few milliseconds and suddenly your explosion hits more like a real physical pressure wave than a digital event. That kind of micro-timing control is frustrating to do any other way inside a DAW, and having it built in here is one of Weaponiser Basic's cleaner design choices.
Individual MIDI triggering per engine means you can play the Onset on one note and the Tail on another. That's not a workflow everyone needs, but for composers building interactive audio or working in middleware-adjacent sessions, it opens up more dynamic possibilities than a standard sampler would.
The Sample Library: What 1,385 Samples Actually Covers
515 weapon samples is the headline figure, and that's a reasonable starting point for the category. But the content goes wider than gunshots.
The real and sci-fi weapon content is the core. Owners report superb results for gun-related sounds specifically. That's the strongest area of the library. If your project needs convincing firearm SFX and you don't have a sound library budget or the time to record your own, this is where the value sits most clearly.
The sci-fi sound effects are the second content tier. These are where the synthesis engines become relevant. Blending a sci-fi sample with a synthesised tone in the Body engine is how you get a laser-bolt sound that feels physical rather than thin. The asset range supports that kind of hybrid design.
Footsteps and surfaces are present but not the plugin's primary strength. This isn't a full foley toolkit for character movement. Think of it as a supplement. If you need a footstep on a metal grate as part of a tension cue, the content is there. If you need a full library for a walk cycle across five surfaces, you'll be importing your own files.
Whooshes and transitions round out the library. These are the connective tissue of an action soundtrack: the sounds that bridge cuts, underscore camera moves, and punctuate impact moments. 1,385 total samples spread across those four categories is a usable working set for a starter sound designer, though experienced users will hit the ceiling and start importing custom assets relatively quickly.
The drag-and-drop import is there for exactly that moment. Load your own one-shots directly into any of the four engines. The plugin doesn't restrict you to its own content once you've imported a file, which keeps the workflow open-ended even as the included library shows its limits.
One real friction point here: when files get relocated on your drive, Weaponiser Basic can't automatically search folders to find them. You have to manage that manually. If you're working with a large imported asset set and your sample library moves between drives or folder structures, you'll lose time tracking down missing files. It's the kind of workflow snag that's annoying on a good day and genuinely costly on a deadline.
The Tag-Driven Browser: Finding What You Need
Navigation in a 1,385-sample library without a good browser becomes a chore fast. The tag-driven browser is Weaponiser Basic's answer to that problem.
Tag-based browsing means samples are marked with descriptors rather than just sitting in a flat folder hierarchy. You search by tag rather than by filename or folder path. For a beginner sound designer who hasn't yet developed folder organisation habits, this is a sensible approach.
In practice, it means you can filter for "pistol" or "sci-fi" or "whoosh" rather than hunting through a directory tree. When you're in the middle of a session and need a specific character of sound quickly, that matters.
The flip side is the interface size problem. The browser itself is constrained by the same non-scalable window. If your eyes work better with larger UI text, this becomes uncomfortable over a long session. There's no workaround for it currently.
The 160 presets interact with the browser too. You can reach a preset quickly, audition it, and decide whether the Onset, Body, Thump or Tail needs swapping. That's a reasonable preview workflow for a plugin at this price point. It's not as deep as a dedicated sample management app, but for in-DAW use it doesn't need to be.
Burst Mode and Real-Time Fire Rate
Burst mode is one of the cleverer features in Weaponiser Basic. It takes a single one-shot asset and generates automatic bursts from it. You don't need separate samples for a machine gun burst versus a single pistol shot. Load one gunshot sample, engage burst mode, set the fire rate, and the plugin handles the rapid-fire sequencing.
Fire rate is adjustable in real-time. That means you can automate it. Speed the fire rate up as a cue intensifies, or dial it back for a more deliberate, spaced rhythm. For action soundtrack work where tempo and energy are constantly shifting, that real-time adjustment is a workflow win over manually sequencing individual hits on a timeline.
The velocity sensitivity layer feeds into this too. Each trigger responds to MIDI velocity, so your bursts can vary dynamically based on how hard the notes are hit. Push harder and the burst feels more aggressive. Pull back and it softens. For a composer who's playing weapon sounds live or programming them with velocity curves, this is how you get variation without programming every single hit individually.
The zero-crossing click issue is relevant here. Owners report that retriggering synth sounds before the full decay completes causes audible clicks. In burst mode, where retriggering is the entire point, this can surface if your fire rate is set high relative to the decay time of the loaded sound. You'll want to watch the relationship between decay length and fire rate when using synthesis-generated content in burst mode. With sample-based content it's less of an issue.
This is one of those workflow snags that experienced sound designers will catch quickly and work around, but starter users might spend time confused about why their burst sounds glitchy before isolating the cause.
MIDI Triggering and Individual Engine Control
MIDI integration in Weaponiser Basic goes deeper than a simple "play on note" setup. Individual engines can be triggered independently via MIDI. That means you can assign the Onset to one note and the Tail to another, or mute the Body engine and trigger only the Thump for a low-frequency hit that works as a felt impact rather than a heard sound.
For composers working in game audio or interactive media, this opens up adaptive sound design inside a familiar DAW environment. Trigger the full four-engine stack for a close-range gunshot. Trigger only the Body and Tail for a distant one. The same plugin instance handles both via MIDI note assignment rather than needing separate instances for each variation.
Standard playback users building a linear film or TV score will get less from this. If you're spotting to a locked picture and programming hits on a MIDI track, the per-engine MIDI triggering adds precision. But if you're just drawing automation and playing back presets, you won't use the deeper MIDI routing much.
The multichannel output is the complement to the per-engine MIDI control. Each layer can be sent to its own stereo track in your DAW. That means your Onset, Body, Thump and Tail each hit their own channel and get their own processing chain downstream. This is where the EQ limitation hurts less. The built-in EQ is peak-only, but if each engine is on its own track, you can put a fully-featured EQ plugin on each one separately.
It's an elegant workaround, and probably the intended workflow for anyone who needs serious spectral shaping. The limitation is that it requires more session infrastructure. You need to set up four return tracks per instance. For a quick cue, that's overhead. For a game session where you're designing sounds you'll export and hand off, it's just proper signal chain setup.
The Synthesis Engines
Three built-in synthesis engines are included. They're not standalone synths. They work alongside the sample engines within the Onset, Body, Thump and Tail architecture.
The synthesis layer is where you shape tone. Push the drive in a synthesis engine and the top end turns gritty. Pull back and the generated tone sits underneath the sample content as a low-frequency bed. For sci-fi weapon design especially, this blend of organic sample and synthesised component is what separates a convincing energy weapon from a thin beep on top of a gunshot.
The synthesis engines are most useful when you're trying to build something that doesn't exist in the sample library. Hybridise a real pistol Onset with a synthesised sci-fi tone in the Body and you've created a weapon sound that fits a near-future setting without sounding purely electronic or purely real. That creative range is what makes the synthesis inclusion meaningful rather than decorative.
Work with what the interface shows you when you're inside the session. The confirmed fact is three synthesis engines, and they operate within the four-section architecture.
Multichannel Output and Downstream Processing
The multichannel output is one of Weaponiser Basic's most practically useful features for anyone building a professional signal chain, and it's also the main practical fix for the EQ limitation.
When each engine sends to its own stereo track, you get full control over how each sonic layer is processed. The Onset gets its own compressor to tighten the transient. The Thump gets a low-pass to keep only the sub-frequency weight. The Tail gets a reverb send that suits the acoustic space of the picture you're spotting to. The Body gets an EQ to shape the midrange character.
That's a genuinely useful workflow, and it's closer to how professional weapon sound design is handled in full post-production facilities. The difference is that in Weaponiser Basic, you're designing the components in a single plugin before routing them out. That saves time compared to building the same four-layer construction manually in your DAW from scratch.
The CPU intensity means that if you're stacking eight or ten instances in a large session, that multichannel routing will compound the load. Each instance is producing multiple audio streams. Owners' advice to freeze or commit tracks holds especially here. Design the sound, dial it in, bounce it to audio, and free the CPU for the next element.
The EQ Problem in Practice
This needs its own section because the EQ limitation shapes how you use the entire plugin.
Peak filter mode only. That's the full scope of the built-in EQ. No shelving. No high-pass to roll off rumble below 80Hz. No low-pass to knock back a harsh 10kHz crack. No bandpass or notch.
For weapon SFX design, that's a real gap. Take a standard gunshot sample. The low-end energy from a close-proximity recording can be enormous, and without a high-pass filter you can't clean it up inside the plugin. You have to route out to an external EQ, which works, but it adds steps.
The multichannel output workflow is the fix, as covered above. But if you're running Weaponiser Basic as a quick insert on a single stereo track without multichannel routing set up, the EQ is frustrating and you'll want a separate EQ in your chain immediately after the plugin.
The honest assessment is that this feels like a cost or scope decision in the Basic version. It's annoying because the core engine architecture is clever, the burst mode is useful, and the MIDI triggering is well thought out. The EQ being this limited feels like a rough edge that shouldn't have made it into a commercial release without at least a high-pass and a low-shelf.
The IR Reverb Bug
This one deserves plain language. There's a known IR reverb bug in Weaponiser Basic. When it triggers, the fix is to relaunch your DAW and unload all sound files. That's not a quirky limitation you work around. That's a session-disrupting failure mode.
The practical mitigation is to save compulsively before using the IR reverb and to have a habit of bouncing Weaponiser outputs to audio early in your session so you're not dependent on the live plugin at a critical moment. It's the kind of adaptation experienced software users develop automatically, but starter sound designers who the developer explicitly targets with this product won't necessarily know to do that until they've been burned by it once.
This bug is the most significant concrete flaw in Weaponiser Basic's current state. The EQ limitation is a design choice. The non-scalable interface is a UI shortcut. The IR reverb bug is a reliability problem that should have been patched.
System Requirements and Real-World Performance
The minimum spec is a 2.4 GHz dual-core processor with 4 GB RAM. That's a low bar on paper, but owners report the plugin is fairly CPU intensive in practice. The gap between minimum requirement and comfortable daily use is worth noting.
On the RAM side, owners specifically report that it takes very little RAM even with multiple instances running. So the 4 GB minimum is realistic from a memory standpoint. It's the CPU where you'll feel the pinch if your machine is older or you're running a dense session.
macOS support runs from 10.13 through macOS 11 Big Sur, with M1 and M2 Mac support confirmed. Windows 10 and later are supported. The 1.88 GB install size is modest and predictable. The 44.1 kHz to 192 kHz sample rate range covers everything from standard project delivery up to high-resolution audio for broadcast or premium streaming.
Plugin formats on Mac are VST, AU, and AAX Native. Windows gets VST and AAX Native. AU's absence on Windows is standard, not a Weaponiser-specific limit. AAX Native support means Pro Tools 11 and later is covered, which matters for post-production workflows where Pro Tools is the facility standard.
Supported DAWs include Pro Tools, Logic Pro X, Nuendo, Ableton Live, Cubase, Reaper, and StudioOne. That's a wide coverage set. If you're in one of those environments, you won't have a compatibility issue. Standalone use is not in the notes.
The one-computer-at-a-time activation limit bears repeating here. If you work between a studio desktop and a laptop on location, you'll need to manage licence transfers. That's not a dealbreaker for everyone, but it's friction that professionals with mobile workflows should factor in before buying.
Workflow Walkthrough: Spotting a Gunfight Cue
Here's a concrete scenario for how Weaponiser Basic fits into a real session.
You're composing a cue for an action sequence. The picture edit is locked. You've got three distinct gunshot events to spot: a close-range pistol at 00:12, a burst from an automatic rifle at 00:34, and a distant echo of a shot at 01:08.
Open Weaponiser Basic on a MIDI track. Load a pistol preset. The preset hits Onset, Body, Thump and Tail with matched samples. Audition it against the picture. The timing feels slightly delayed on the Onset. Pull it forward on the colour-coded timeline inside the plugin. Now the crack lands frame-accurately. That kind of micro-offset control inside the plugin saves you from having to nudge individual audio clips on separate tracks in your DAW.
For the automatic rifle burst at 00:34, switch on burst mode. Set the fire rate to match the edit rhythm. If the burst needs to accelerate over its duration, automate the fire rate control in real-time. What would take several minutes of programming individual MIDI hits becomes a parameter sweep.
The distant echo at 01:08 is where you'll want to work with the Tail engine specifically. Dial in a longer tail, roll back the Body and Onset levels, and you get the character of a gunshot heard from distance without it reading as a full close-range crack. The multichannel output lets you send the Tail to a reverb-heavy bus in your session for the room ambience.
At the end, bounce all three Weaponiser events to audio. Free the CPU. Move on to the next cue. That's the intended workflow and it works as described.
Workflow Walkthrough: Building a Sci-Fi Weapon from Scratch
Starting from an empty preset is where the synthesis engines come in.
Load a sci-fi sample into the Onset engine. It's close but too organic. Add a synthesised tone in the Body engine to push it towards electronic. Adjust the blend until the organic transient of the sample and the synthesised sustain sit together as one coherent sound rather than two separate layers.
Use the colour-coded timeline to tighten the synthesis onset so it doesn't lag behind the sample's transient. Even a few milliseconds of offset here makes the sound feel disconnected. Dial in the offset on the timeline until the attack is unified.
Now the Thump engine. For a heavy energy weapon, you want felt impact as well as heard crack. Load a low-frequency impact sample into the Thump. Send it to its own stereo track via multichannel output and roll off everything above 200Hz on a separate EQ plugin on that track. Now the weapon has physical weight without the Thump content contaminating the midrange clarity of the other engines.
The Tail engine handles the energy dissipation. A short, slightly metallic decay works for a weapon that feels technological. Adjust the velocity sensitivity so harder MIDI hits produce a longer, more resonant tail. Softer hits get a shorter, drier decay. That variation is what makes a weapon sound feel interactive rather than static.
Export the designed sound as audio for use in a game engine or a media cue. The integrated architecture accelerates the design session compared to assembling the same construction from scratch in a DAW. That's the genuine value at $41.
Where It Shines
Gun-related sounds. That's the clearest strength. Owners report superb results specifically here, and the library's 515 weapon samples anchor the content in that territory.
Time savings are real. The Onset-Body-Thump-Tail architecture, the colour-coded timeline, burst mode with real-time fire rate, and MIDI velocity sensitivity combine to genuinely accelerate the weapon SFX workflow compared to assembling the same construction from scratch in a DAW.
The multichannel output is clever design. Having each engine on its own track downstream is not just a workaround for the EQ limitation. It's a professional routing approach that gives you full processing flexibility without leaving the plugin.
RAM efficiency is a genuine win. With multiple instances running, the plugin keeps its memory footprint low even as CPU use climbs. For a dense session with many SFX elements, knowing you're not eating RAM is reassuring.
The drag-and-drop import and tag-based browser make this a usable daily tool rather than a closed system. Import your own assets, search them by tag, and build from your preferred content inside the same interface. At 1.88 GB installed, the plugin doesn't demand much space and returns a broad starting asset set for that footprint.
Against the Field
Two products come up regularly in comparisons with Weaponiser Basic: BOOM Library and Pro Sound Effects.
Users who mention BOOM Library describe its samples as less harsh or loud than the content in Weaponiser Basic. BOOM Library is primarily a sound library, not a plugin with an integrated design environment. If you want maximum sample quality and you're comfortable doing your own layering in your DAW, BOOM Library may serve you better. If you want the integrated four-engine design environment with burst mode, real-time fire rate, and per-engine MIDI control, Weaponiser Basic's plugin architecture is doing something BOOM Library doesn't offer in the same form.
Pro Sound Effects is similarly mentioned by users seeking less harsh or loud sample characteristics. Same trade-off applies. These are library-focused alternatives rather than plugin-environment alternatives. The comparison tells you something about Weaponiser Basic's sample character: some users find the included content sits loud and harsh in the mix and prefer to source from elsewhere. That's worth knowing before you buy.
Reviewers report that the Basic version feels overpriced relative to its content compared to Weaponiser Fully Loaded. If you're deciding between the two versions, check whether the Fully Loaded variant's content and feature additions justify the price difference for your specific use case. The Basic version is the entry point, not the ceiling of what the platform offers.
Who Should Buy This
- ✅ Buy if you're a starter sound designer who needs an in-DAW weapon SFX tool at $41 and wants a guided architecture rather than a blank session to fill from scratch.
- ✅ Buy if you're a composer scoring action, sci-fi, or thriller content and need fast, credible gun and foley sounds without a separate sound design app in your chain.
- ✅ Buy if you're spotting to picture and want real-time burst mode with automatable fire rate and per-engine MIDI control to match your edit precisely.
- ❌ Skip if you need a scalable interface on a large monitor or multi-screen setup. The non-resizable UI will frustrate you daily.
- ❌ Skip if you need robust IR reverb integration inside the plugin. The known bug makes it unreliable as a core part of your design workflow.
- ❌ Skip if you work across two machines regularly. One active licence at a time creates friction that adds up over a long project.
Specs & Technical Details
| Specification | Detail |
|---|---|
| Developer | Krotos |
| Price | $41 |
| Plugin Format | VST, AU (Mac only), AAX Native |
| OS Support | macOS 10.13–11 Big Sur (Intel, M1/M2), Windows 10 and later (64-bit) |
| Activation | iLok account required; internet connection at activation; one computer at a time; iLok 2 dongle or later supported |
| CPU Usage | Moderate to heavy; owners recommend freezing/committing tracks with multiple instances |
| RAM | 4 GB minimum; owners report low RAM draw even with multiple instances |
| Disk Space | 1.88 GB |
| Sample Rate Support | 44.1 kHz – 192 kHz |
| Minimum Screen Resolution | 1280×1024 |
| DAW Support | Pro Tools 11+, Logic Pro X, Nuendo, Ableton Live, Cubase, Reaper, StudioOne |
| Included Samples | 1,385 (515 weapon samples + sci-fi, footsteps, whooshes) |
| Included Presets | 160 |
| Trial Available | Yes (iLok account required for demo) |
| Version Reviewed | N/A |
Score Breakdown
| Category | Score | Notes |
|---|---|---|
| Sound Quality | 3.5/5 | Gun-related samples are the standout; some content reported as harsh or loud; 515 weapon samples is a solid base |
| Value for Money | 3.0/5 | Reviewers flag the Basic version as overpriced relative to Fully Loaded; the architecture is good but the content ceiling is visible quickly |
| Ease of Use | 3.0/5 | 160 presets and tag browser are beginner-friendly; non-scalable interface and IR reverb bug hurt the daily experience |
| Features | 3.5/5 | Four-engine architecture, burst mode, real-time fire rate, per-engine MIDI and multichannel output are genuinely useful; EQ is weak |
| CPU Efficiency | 3.0/5 | Fairly intensive; multiple instances require freezing; RAM use is low but CPU overhead is real |
| Overall | 3.3/5 | A capable starting point for weapon SFX design with real workflow benefits and real limitations that can't be ignored |
Alternatives to Consider
If the iLok requirement, the non-scalable UI, or the EQ limits push you elsewhere, here are the alternatives that come up in the same conversations as Weaponiser Basic.
BOOM Library is the most commonly cited alternative. Users who prefer less harsh and less loud sample characteristics point to BOOM Library's recordings as a more controlled starting point. BOOM Library is a sample library rather than an integrated plugin design environment, so you're trading Weaponiser Basic's architecture (burst mode, per-engine MIDI, real-time fire rate) for higher sample quality and a more library-centric workflow. If you're comfortable layering samples yourself in your DAW and your priority is source audio quality, BOOM Library is worth serious consideration.
Pro Sound Effects gets mentioned alongside BOOM Library for the same reason: users seeking sample content that sits less aggressively in the mix. Same trade-off applies. No integrated design plugin environment, but a reputation for well-recorded, mix-ready content. If the included Weaponiser Basic samples feel loud or harsh on your project, Pro Sound Effects gives you a large catalogue to pull from.
The honest summary: neither alternative replaces Weaponiser Basic's specific plugin architecture. If you want burst mode with automatable fire rate, per-engine MIDI triggering, and the Onset-Body-Thump-Tail design environment all inside a single DAW plugin, Weaponiser Basic or the Fully Loaded upgrade are your most direct options in this category based on what the community discusses.
The Bottom Line
Weaponiser Basic is a plugin built around a genuinely intelligent idea: model the acoustic anatomy of a weapon sound, let you mix and match each layer independently, and give you real-time burst and MIDI control so you can spot and design without leaving your session.
The idea is sound. The execution has visible seams.
The IR reverb bug is inexcusable at this point. The EQ is underpowered for the job it's meant to do. The interface won't grow with your screen. And reviewers are right that the Basic version's content-to-price ratio becomes uncomfortable when you look at the Fully Loaded variant.
But the four-engine architecture is clever. The burst mode is satisfying to use when it works cleanly. Owners report real time savings. And the multichannel output, properly set up, sidesteps most of the built-in processing limitations.
If you're a starter sound designer who wants a structured entry point into weapon SFX without spending a session trying to understand how to layer a gunshot from scratch, Weaponiser Basic gives you that structure at $41. Demo it first via the iLok trial. Load a preset, engage burst mode, and see whether the architecture fits the way you think about sound design.
If you're already beyond beginner territory and you're buying this for a live production facility with two machines, a large monitor rig, and a need for reliable IR reverb processing, the limitations will irritate you more than the strengths will satisfy you.
That's the split. Know which side of it you're on before you buy.
Frequently Asked Questions
Does Weaponiser Basic require an iLok dongle?
An iLok account is required for activation, but a physical iLok dongle is not mandatory. You can activate via iLok licence manager without a dongle. If you do want to use a dongle, iLok 2 or later is supported. An internet connection is required at the time of activation regardless of which method you choose.
Can you use Weaponiser Basic on two computers?
The software can only be active on one computer at a time. If you work between two machines, you'll need to transfer the licence between them via iLok licence manager. That adds friction to a mobile workflow, so plan accordingly if you split time between a studio and a laptop setup.
What's the difference between Weaponiser Basic and Weaponiser Fully Loaded?
Weaponiser Basic is the entry-level version with 1,385 samples and 160 presets. Reviewers report that the Basic version feels overpriced relative to its content compared to the Fully Loaded variant, which suggests the Fully Loaded version offers a more comprehensive asset set. If your budget allows, it's worth comparing both before committing to the Basic tier.
Is Weaponiser Basic useful for anything other than weapon sounds?
Yes. The library includes sci-fi sound effects, footsteps and surfaces sounds, and whooshes and transitions alongside the weapon content. The plugin architecture handles any kind of one-shot SFX design that benefits from layering across onset, sustain, impact, and tail. It's not purely a gun plugin, though weapon sounds are where it performs most strongly according to owner reports.
How do you fix the IR reverb bug in Weaponiser Basic?
The documented fix is to relaunch your DAW and unload all sound files in the plugin. It's a disruptive process. The practical workaround is to save your session before engaging the IR reverb, and to bounce Weaponiser outputs to audio early in your session so you're not dependent on the live plugin if the bug triggers near a deadline.
Can you import your own samples into Weaponiser Basic?
Yes. The drag-and-drop multi-sample interface lets you import custom sounds directly into any of the four engines. You're not limited to the included library. The main friction point is that if imported files get relocated on your drive, the plugin can't automatically search folders to find them, so you'll need to manage file paths manually if your folder structure changes.